
What is the Process of Elimination Fix
Process of elimination fix is what the name says. You try to locate the issue by removing things that you have confirmed to be working. You typically do this when you’re getting a non-descriptive error in your compile log, or the level is just out right crashing the game when you try to load it.
- Make sure you need to actually use this type of fix.
- Look over your compile log for errors.
- Put your compile log into the Interlopers Compile Log Error Checker to see if it finds something you missed.
- We need to determine at what compile level the error is happening. Complete these 3 sub steps to find out, and then move on to the rest of this guide.
- Compile with just VBSP. If the issues return, then you can do all your troubleshooting with VBSP only compiles. Move onto step 2, and only use VBSPwhen doing test compiles. If the level works fine on a VBSP only compile, move onto step 1.2
- Compile with just VBSP and VVIS. If the issues return, then it is a VIS problem, and you will do all your troubleshooting with VBSP and VVIS only compiles. Move onto step 2, and only use VBSP and VVIS when doing test compiles. If the level works fine on a VBSP and VVIS only compile, move onto step 1.3
- Compile with all 3 VBSP, VVIS and VRAD. The issue should return, and it should be a RAD issue. You’ll do all troubleshooting with a VBSP, VVIS and VRAD compile.
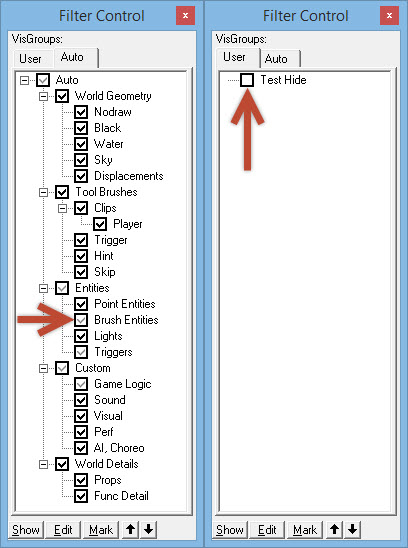
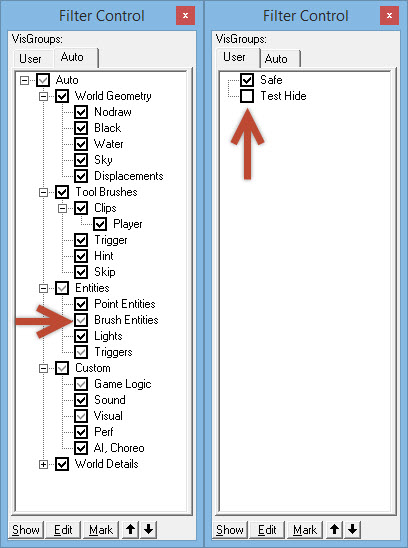
- With what compile process that’s causing the issue sorted out. Head over to the Auto tab on the VisGroups window. NOTE: Your vis groups may differ.
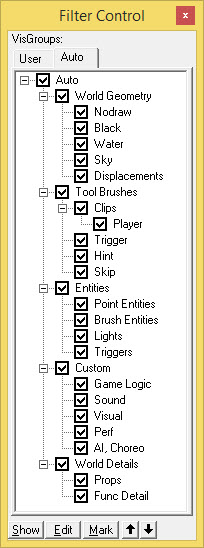
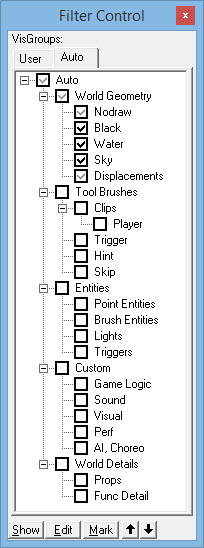
- Start by unchecking everything except World Geometry. Compile the level and see if the error exists. If not, then your world brushes are not the issue. If the level crashes, then the problem is in one of these remaining checked groups. Turn them off one by one and see when the errors goes away. Since we are in the World Geometry group, you should start with Displacements, then Water. If Displacements and water are off, and the issues is still going on then you’ll have to to cordon tool on the remaining brushes in the level. That’s covered further on in the: How do I use the Cordon Tool to find issues?
- Now turn on groups 1 by 1 until your issue comes back. I suggest this order:
- World Details\Props
- World Details\Func Detail
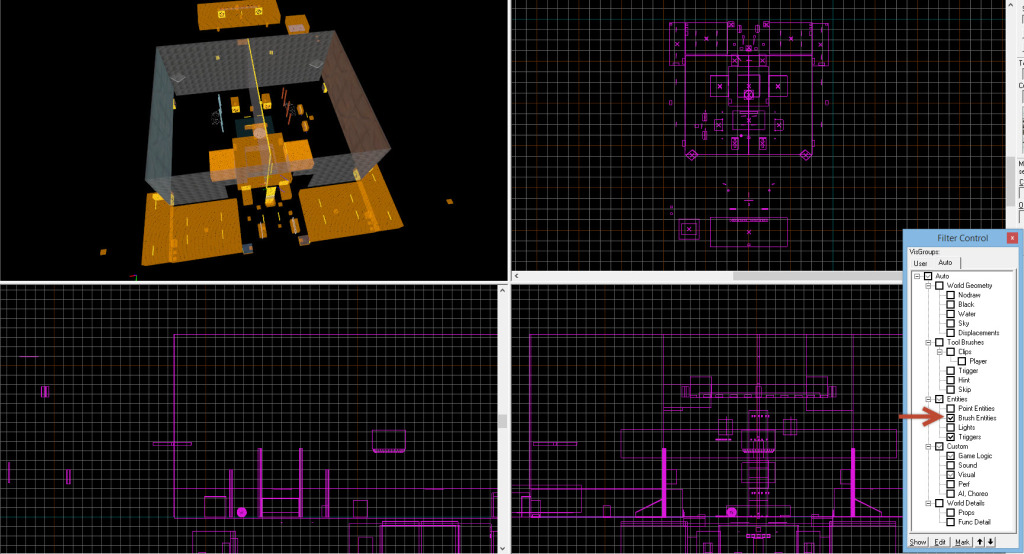
- Entities\Point Entities
- Entities\Brush Entities
- Entities (The entire group, what ever else is left)
- Tool Brushes (Entire group)
- Remaining VisGroups
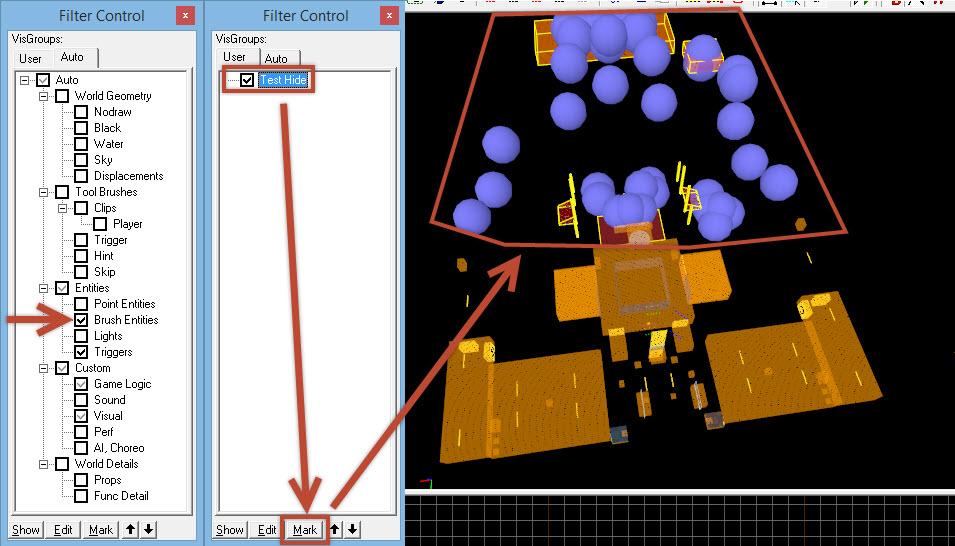
- As you turn these on 1 by 1, more and more stuff will be added back into the level. But as you do, you’ll be marking them as “safe” For instance, you compile with World Geometry, World Details, and Entities\Point Entities and the level has not had the issue. These VisGroups are now considered “Safe” and you have confirmed they are not causing the issues. You then turn on Entities\Brush Entities and the issues come back, we now suspect that this VisGroup has the offending object.. That means that something in this group is causing the issue. You’ll now want to verify this by turning on EVERYTHING EXCEPT the suspected bad VisGroup. (in this case Entities\Brush Entities) Compile the level like this, and everything should work fine. This will confirm that the issue lies in this turned off VisGroup.
- NOTE: When you turn off some VisGroups, you may notice that others turn off as well. This is because some objects are in multiple VisGroups. This is ccompletely normal. As long as the suspected bad VisGroup is completely off (does not have a faded check mark in it) we should be fine.

- NOTE: When you turn off some VisGroups, you may notice that others turn off as well. This is because some objects are in multiple VisGroups. This is ccompletely normal. As long as the suspected bad VisGroup is completely off (does not have a faded check mark in it) we should be fine.
- Now that we have the trouble VisGroup found and confirmed. Turn on ONLY the bad group.
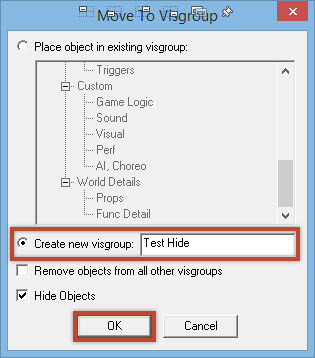
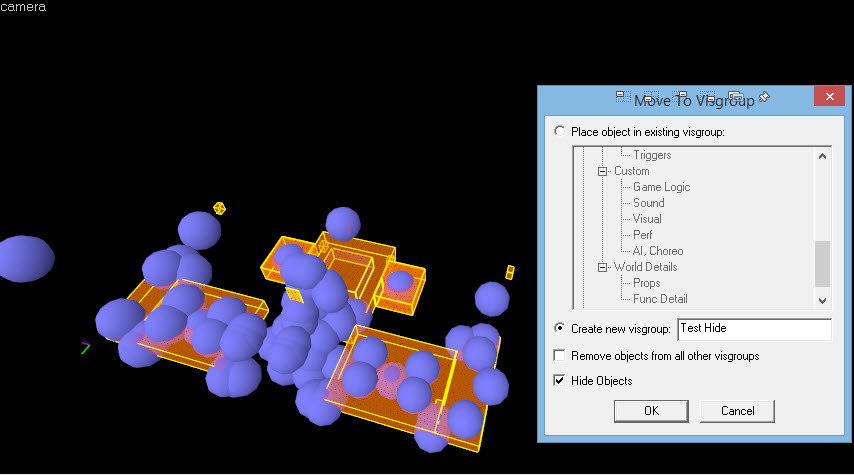
- Select about half of the remaining objects. Then put them into a new User VisGroup called Test Hide.

- Turn on all of your VisGroups under the Auto tab. The trouble VisGroup should show with a shaded check mark, meaning that it is partially turned on. Then switch over to the User tab. You should see your new group as being unchecked.
- Now compile the level again. What we’ve done here is turn off half of the trouble VisGroup. We are now find what parts of this group can be considered “safe”, and which ones are not. If the level works, then you’ve hidden the half with the bad object. If the level breaks, then the offending object is in the remaining half.
- In my case, it’s in the other half, so I now have to remove the “Safe” side of this group, and add the other side to verify that the bad object is in that half.
- Start by turning off all Auto VisGroups, and enable only the bad VisGroup.
- Select our first test User VisGroup and click Mark at the bottom. This selects that VisGroup.
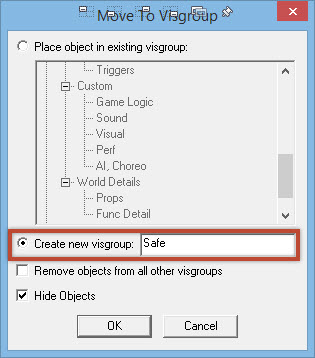
- Click the New VisGroup button again. Add these objects to a new VisGroup called Safe.
- Now Select the Safe User VisGroup, and press ALT+ENTER to open the Object Properties. Click on the VisGroup tab, and then remove them from the Test Hide VisGroup. Click Apply.
- We have to manually remove them from this group so they are not considered potentially bad. If we used the “Remove objects from all other VisGroups” check box when we added them to Safe it would have remove them from the Auto VisGroups as well.
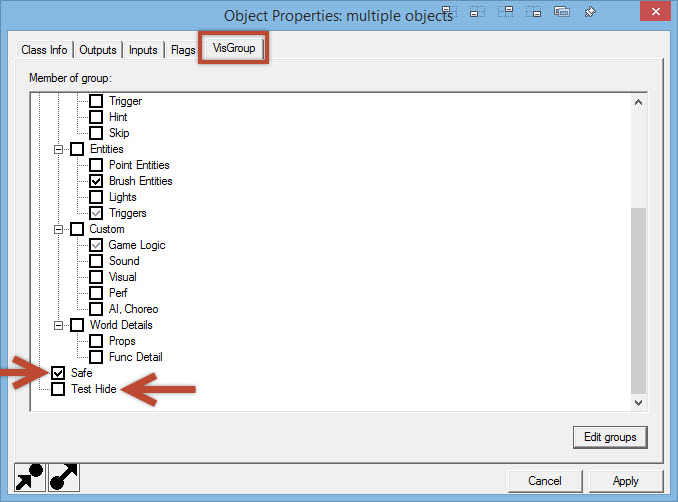
- We have to manually remove them from this group so they are not considered potentially bad. If we used the “Remove objects from all other VisGroups” check box when we added them to Safe it would have remove them from the Auto VisGroups as well.
- Now you’re left with the possible offending half of the bad VisGroup. Select it, and add it into the Test Hide VisGroup.
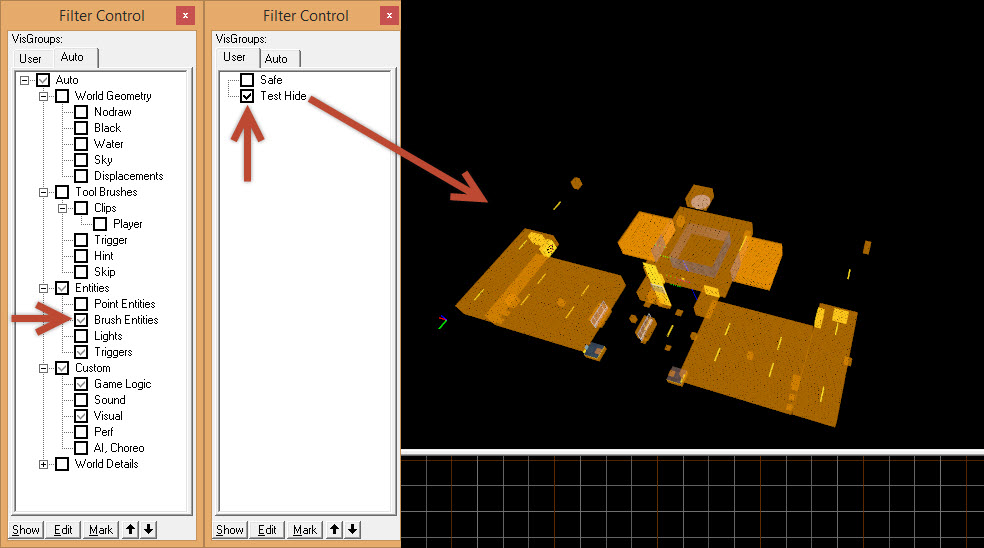
- Turn on all Auto VisGroups, then turn off the User Test Hide VisGroup. Compile and the issue should be gone. This will confirm that the bad object is in the Test Hide VisGroup.
- Now to separate half of the remaining Test Hide VisGroup. We will now find out which half, of the half, the bad objects are living in.
- Turn off all Auto and User VisGroups, then turn on the Test Hide VisGroup.
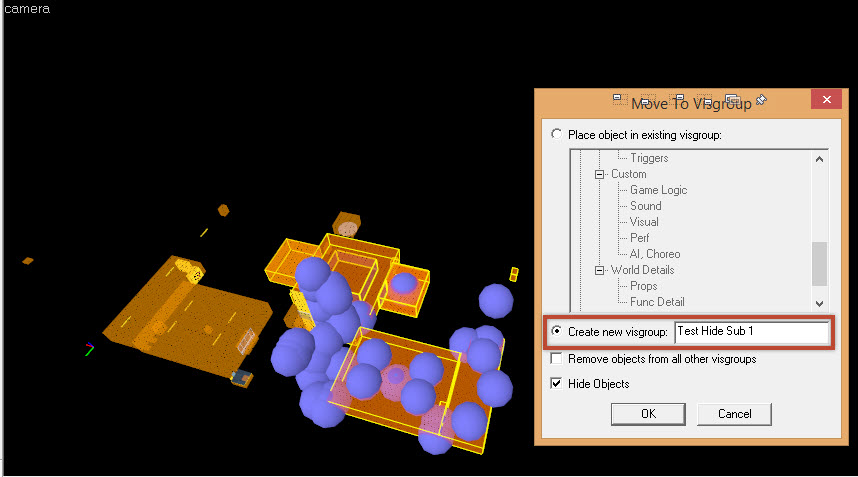
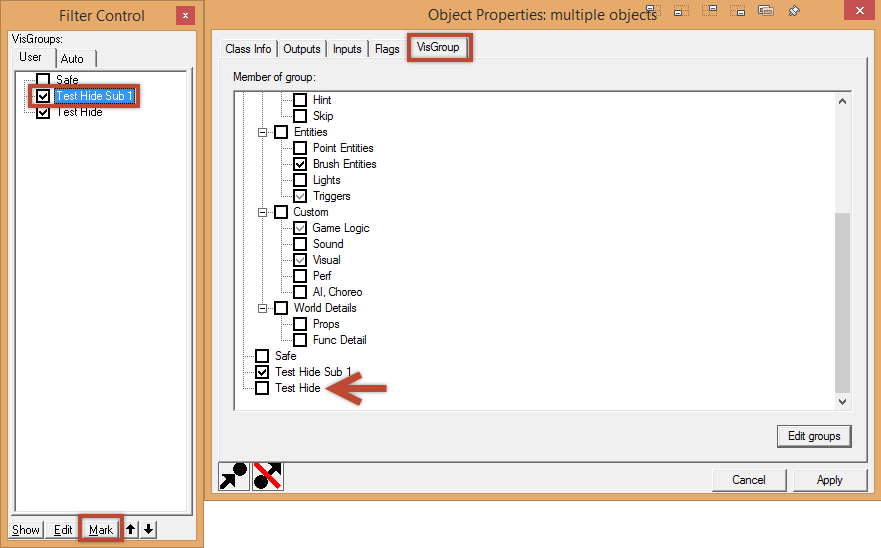
- Select half of these entities, and add them to another VisGroup called Test Hide Sub 1.
- Check and then select the Test Hide Sub 1 VisGroup then click Mark. Press ALT+ENTER to open the Object Properties. Click the VisGroups tab and remove them from the Test Hide VisGroup. Click Apply.
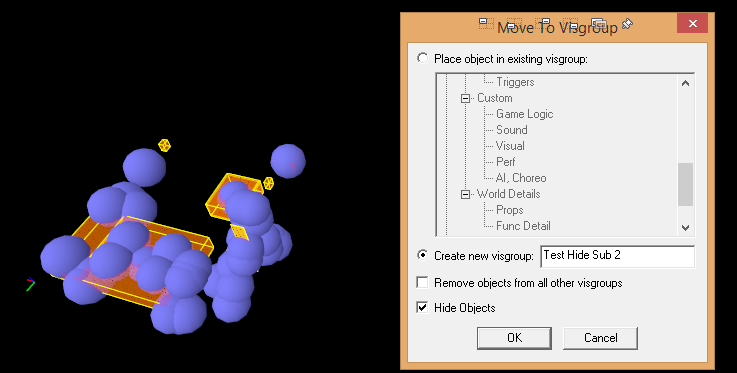
- Turn off Test Hide Sub 1 VisGroup and you’ll be left with the other half of the half. Select these objects, and add them to a new VisGroup called Test Hide Sub 2.
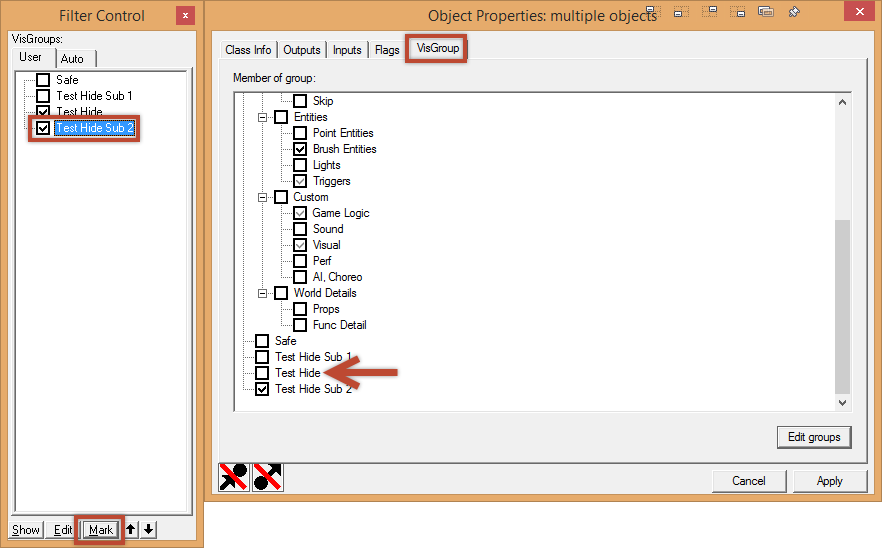
- Check and then select the Test Hide Sub 2 VisGroup then click Mark. Press ALT+ENTER to open the Object Properties. Click the VisGroups tab and remove them from the Test Hide VisGroup. Click Apply.
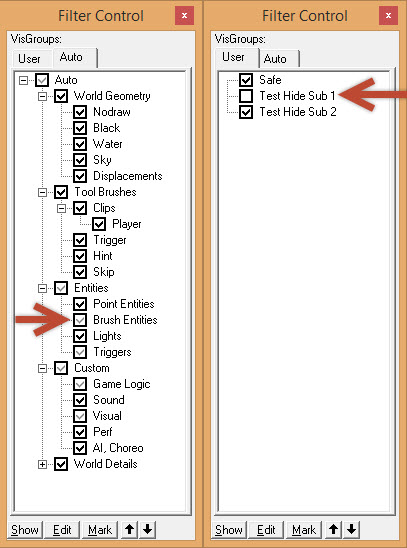
- You’ll now be left with 3 new VisGroups: Safe, Test Hide Sub 1, and Test Hide Sub 2. Turn on all Auto VisGroups, along with the Safe and the Test Hide Sub 2. VisGroup.
- If the level has issues still, then you can assume they are in the Test Hide Sub 2VisGroup. You can confirm this by turning Test Hide Sub 2 VisGroup off. If there are no issues, you can assume the problem objects are in the Test Hide Sub 1 VisGroup.
- Turn off all Auto and User VisGroups, then turn on the Test Hide VisGroup.
- You can now keep cutting each VisGroup in half until you’re left with only a handful of objects. Then you can remove them 1 by 1 until you find what the problem is. Once you find it, you can try various things (Re making, changing it’s shape, removing outputs, changing key values, ect..) until it works.

But what if my level is still broken and yes, I’ve used the cordon tool to try and find the issues.
Ah! Then you must have some super special problem right?! Not really. Typically this happens when you’re at a Source Engine limit. There isn’t much you can do when you’re at this point, but here are my suggestions. Do them in order.
- As a test, click Edit -> Select All and then press SHIFT+A to open the face edit sheet. Under Lightmap Scale enter: 128 then click apply. Compile the level and try again. If this fixes it, then you’re at a light map scale limit. Here are my suggestions:
- Propper some objects so that you’re using model lighting instead of the Light Map grid.
- Fly though your level and manually set all your light map scales to higher and lower values. Then hope that when you’re done it works.
- Start a new level. 🙁