Porting Content From Other Source Engine Games
- Legal / Use of Community Assets
- Understanding the Source Engine File Structure
- Porting an Entire Game’s Content into Another Game
- Extracting Content from a Packed BSP File
- Porting a Single Texture
- Porting a Single Model
- Troubleshooting
Ever wanted more content for your level? Well you’re in luck! Source engine has remained basically the same forever – content wise. Aside from additional features added in various updates and branches, most content is compatible with every game running on Source Engine. This means that if you want some consoles from Portal 2 in your Insurgency level, you can do that. Want some resupply lockers from TF2 in CSGO, we can do that too!
Legal / Use of Community Assets
Before we dive into harvesting other games and levels for their content, there is something that you need to know. Content theft is a real issue. Stealing content from other community creators is a scummy thing to do. So what is considered theft?
- Ripping content from community levels with out permission from the creator for release to the public.
- Using content created by other creators and you not giving credit for those assets.
- Please note that there are plenty of packs of content out there on the web for you to use. All most people ask is that you credit them for use of the content in your NON-COMMERCIAL release.
- Using content for commercial use (For example, making a profit) without the original creator receiving compensation.
- For instance I have various asset packs on my website. You can use them all you want for personal use, but if your CSGO level were to be included into an operation you will now be using them commercially, and you will need my explicit approval. If you do not get my approval your content is subject to removal and legal action can be taken against you. People have stolen content before and they have been banned as a result.
Okay, so what can you do with content? What is considered “Okay”?
- Porting from VALVe game to VALVe game. (CSGO <> Portal 2, CSS <> TF2, ect..)
- Personal use
- This basically means that you’re not releasing it. So if you want content from my levels, de_cruise, de_cache, or some other community level for internal / personal use. You’re basically not profiting from it. You’re not putting it on the workshop, or releasing it to the public. (Remember when you upload to the workshop you’re required to type I Understand to the terms.)
- Using community assets with explicit permission from the creator.
- Most asset creators are happy to share their work, just ask.
Basically, put yourself into the asset creators shoes. That prop you’re porting could have taken hours to make, stealing it is a scummy thing to do. TL:DR, don’t be a jerk, ask for permission or make sure you’re within the terms that the creator outlines when they upload their assets for use. Now that I’m done going over that, let’s get to the meat of porting content!
Understanding the Source Engine File Structure
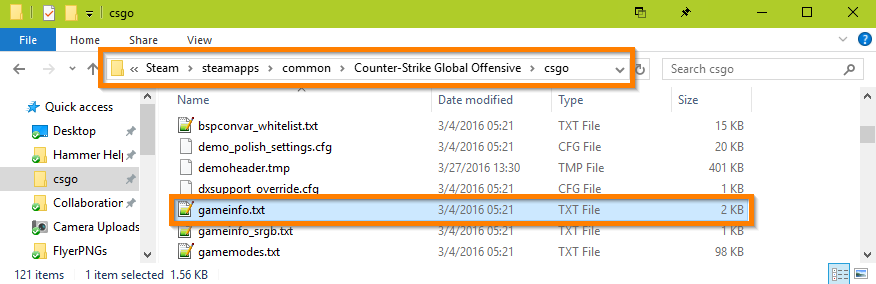
If you’ve ever dug around inside a Source Engine game’s folders you’ve probably noticed that they all have the same folders nested inside the Root folder. Really quick, what’s a “Root” folder? Glad you asked, because I’m going to use that term a few times. The Root folder is considered where the game’s content begins at. This is also the location of gameinfo.txt – for instance CSGO’s root folder is: steamapps\common\Counter-Strike Global Offensive\csgo
The Root folder is typically the game’s abbreviation, Team Fortress 2’s root folder is called TF. Portal 2’s is Portal2. You may also see me say “Materials as root”. This just means that the Materials folder is our root folder for the files that we are working on. If none of this makes sense, then just hang tight, there will be pictures helping you understand.
Inside the Root folder you’ll see these folders, these are the folder we will be working in the most. These folders are where content is stored. I’ve added the file types that you’ll see inside these folders.
- Materials – VTF, VMT
- Models – MDL, PHY, VTX, VVD, DX90.VTX
- Sounds – WAV, MP3
- Particles – PCF, TXT (The manifest is a TXT file)
IMPORTANT: You’re porting content here. You cannot port entities or functions from one game to another. Those are hard-coded into the game. So you’re not getting portals into Counter-Strike, don’t even ask.
Porting an Entire Game’s Content into Another Game
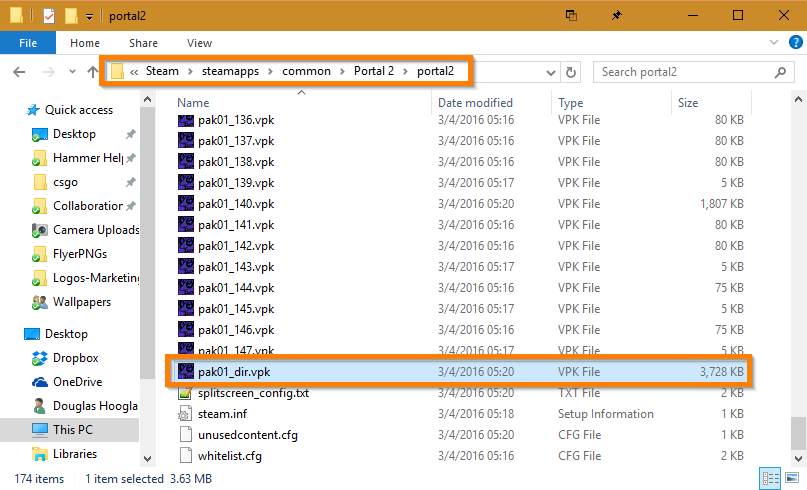
Porting an entire game’s content is crazy easy. Start off by downloading GCFscape. GCFscape allows you to open the file containers that VALVe uses to store game’s content. In my example I’ll be porting all of Portal 2 into CSGO. This is porting from an older branch of Source Engine into a newer branch. Typically older to newer works with little issues. When going from newer to older (Example, CSGO to CSS) you’ll have to do some conversions and troubleshooting. Check out the bottom of this guide for troubleshooting steps
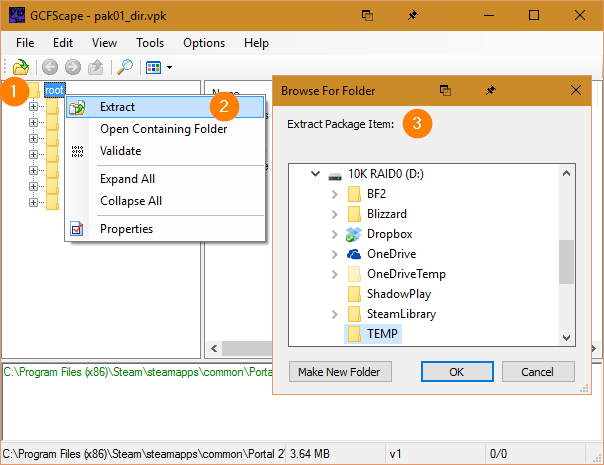
Start by browsing to your source game’s (The game we are porting from) root folder. Inside there you should see a bunch of .vpk files. These are where all of the game’s content is stored. Look for a file with dir in it’s name. The dir file is what acts as a guide to all the other VPK files. You cannot open pak01_95.vpk, but opening the dir file works fine. Let’s open pak01_dir.vpk.
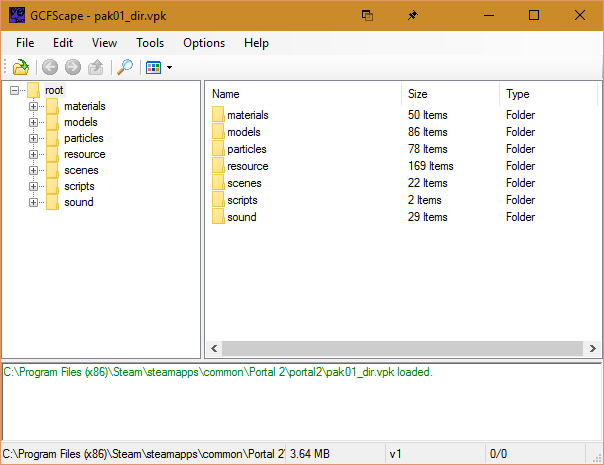
Now that it’s open, you should notice that it has the same folders that are present in our Root folder. The next step is to extract the content from the VPK system. Right click on root and click extract. Then browse to a folder on your computer where you can temporary save the files. Click OK and you’ll see it start to extract all the content. It will take a minute or so to extract it all.
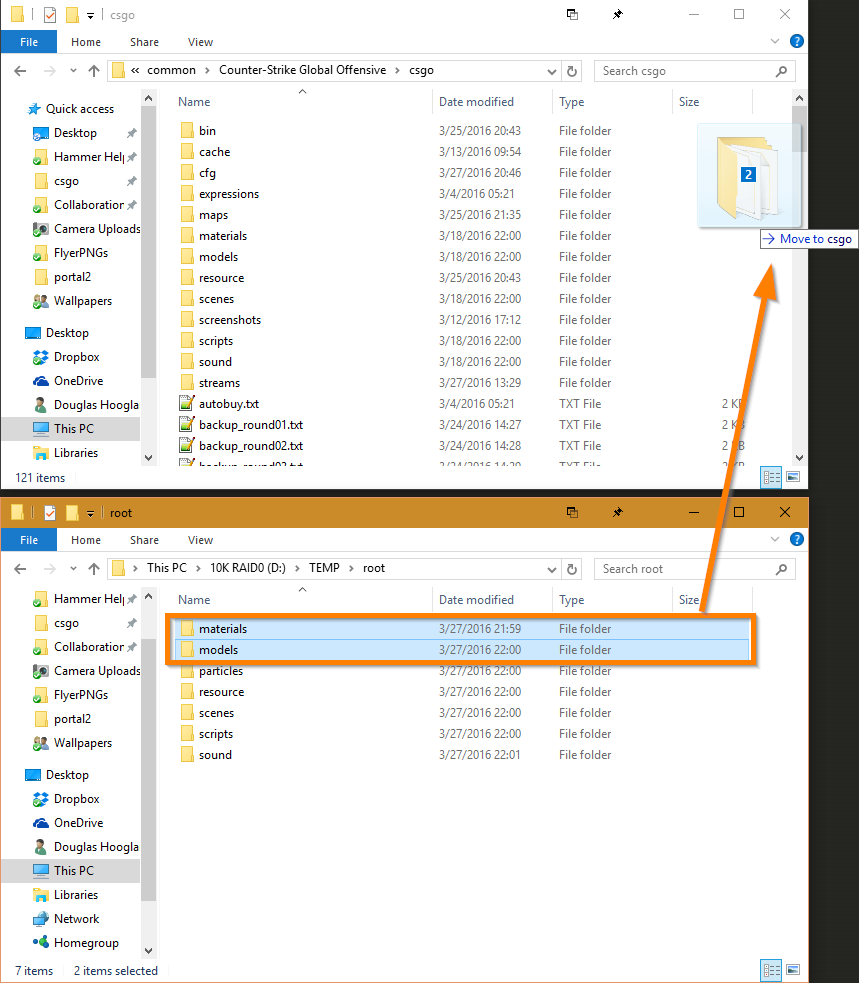
 After the content is extracted, open the folder inside Windows Explorer. Select Materials and Models. (You can select other folders if you want their content, but if you’re harvesting assets, it’s typically just materials and models.) Now just copy them into our destination game’s Root folder so we overwrite the materials and models folder.
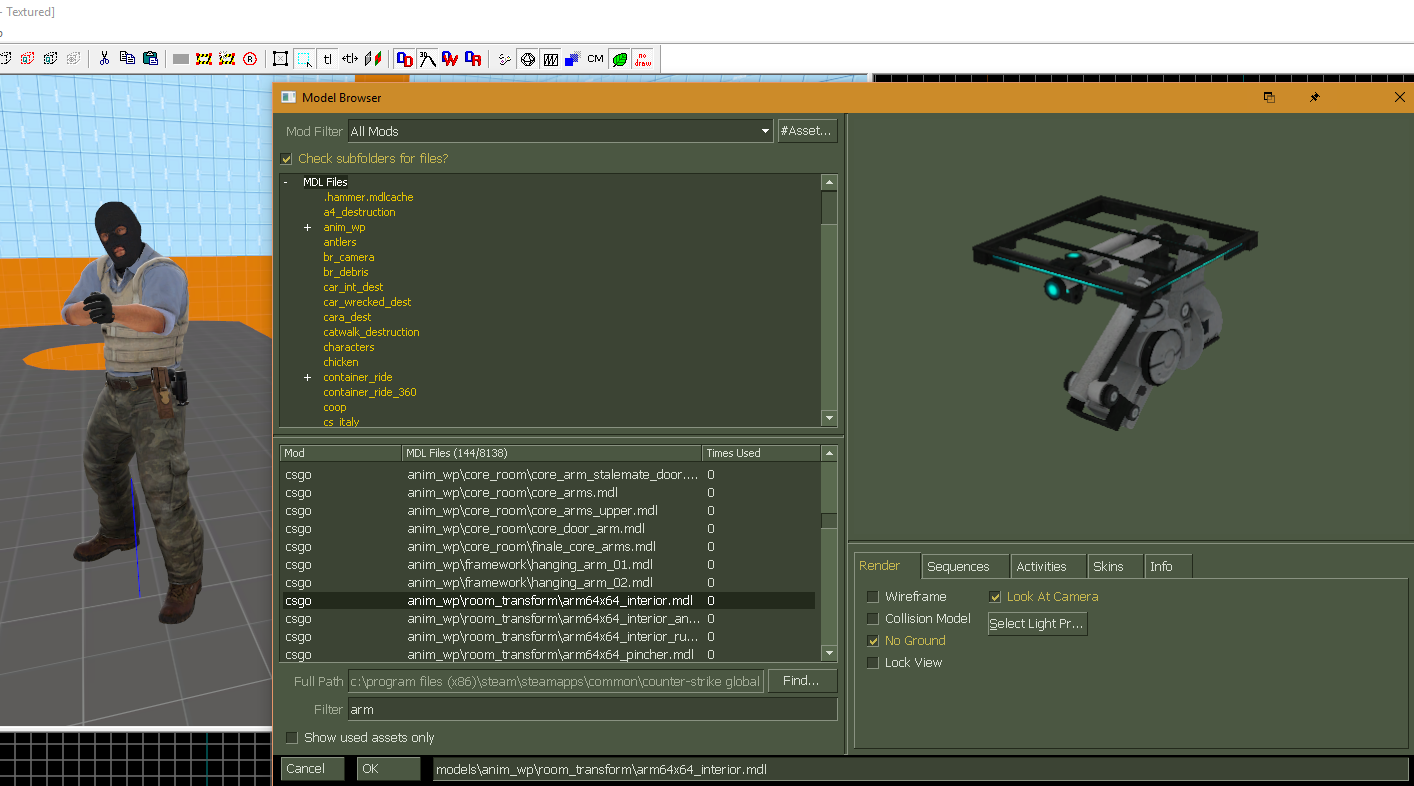
Wait for the files to copy, then load up Hammer. Browse for a model, and enjoy!
Extracting Content from a Packed BSP File
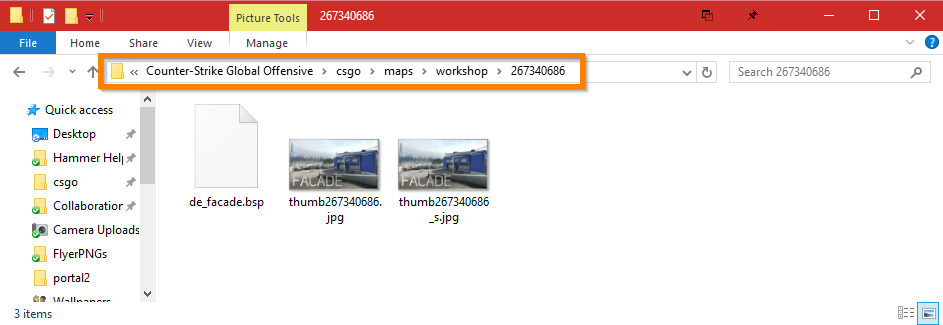
Extracting content from a packed BSP file is easy. Now if you’re doing these, remember what I said above. Please ask for permission for using those assets before using them in your level. The first step is to get the BSP file that you want to extract the content from. If you want to extract content from a workshop level just subscribe to it, and wait for it to download. The downloaded file will be saved into maps/workshop/WORSKHOP_ID.
So we have our Source BSP file. Now we have 2 choices when it comes to extracting the content. Download one of the following programs.
BSPsource
BSPsource is actually a BSP decompiler, but it has a quick setting that let’s you rip the content from a BSP you’re decompiling.
Start by opening bspsrc.jar. (you need Java.) Then drag your BSP file onto the white space.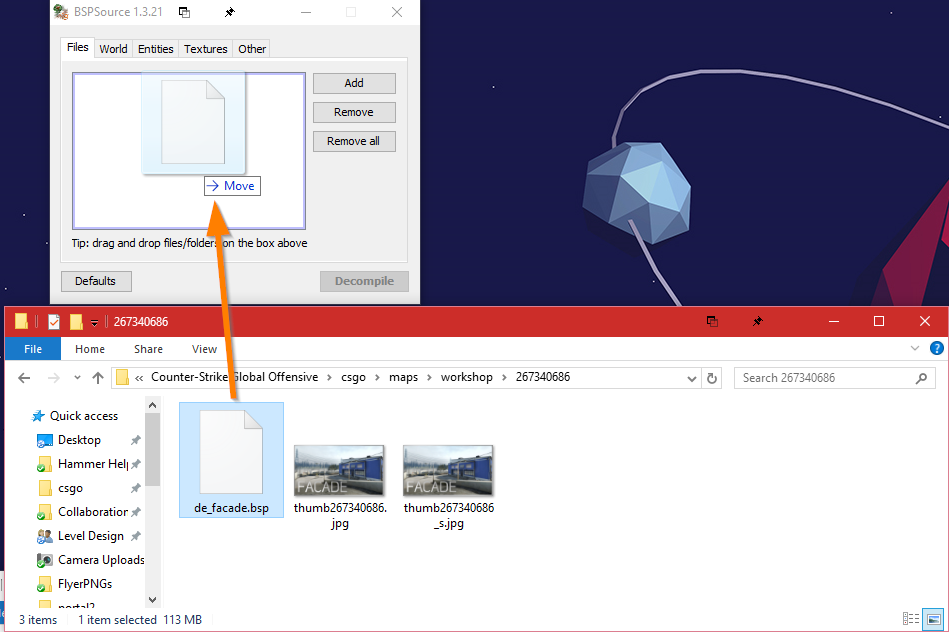
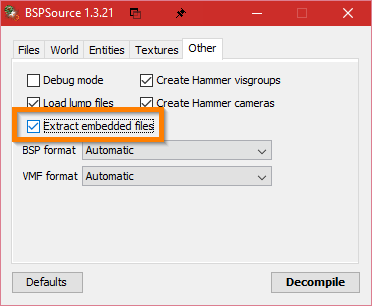
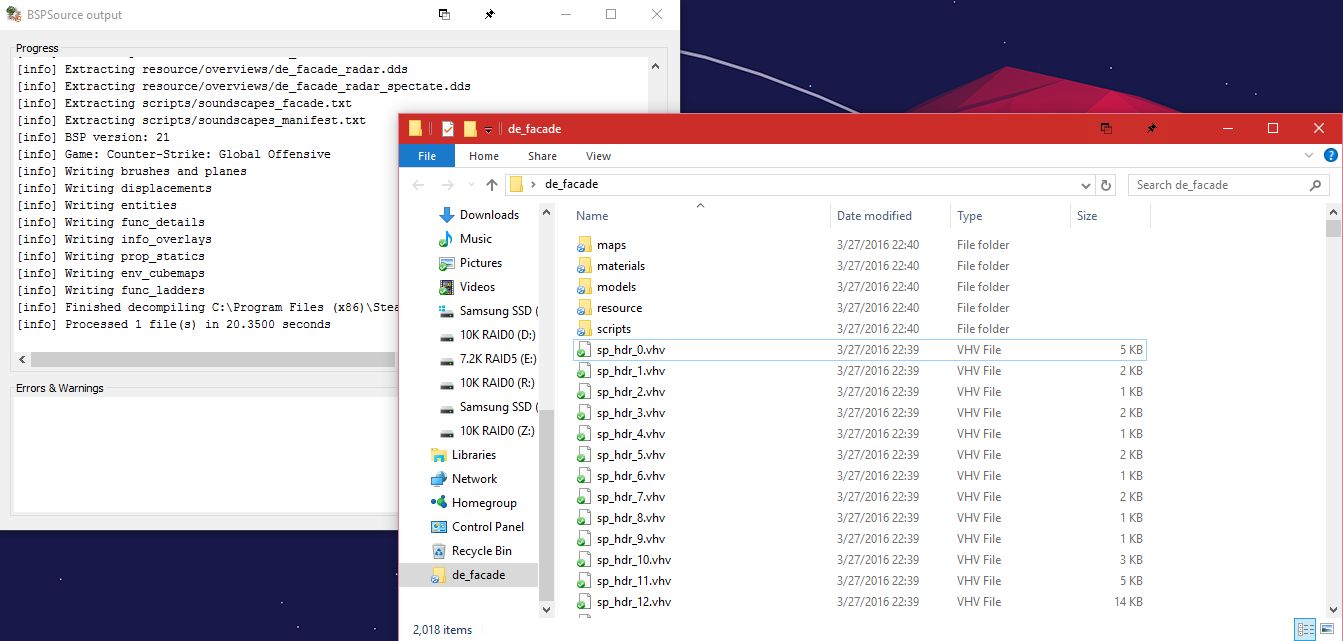
After the file is added, click the other tab, and select Extract embedded files. Then click Decompile, choose a location to save the VMF file to, and you’ll also get a folder with the same name as the map name containing all the custom content from the BSP.
Now just drag the folders with the content into the root folder of the game you’re porting to.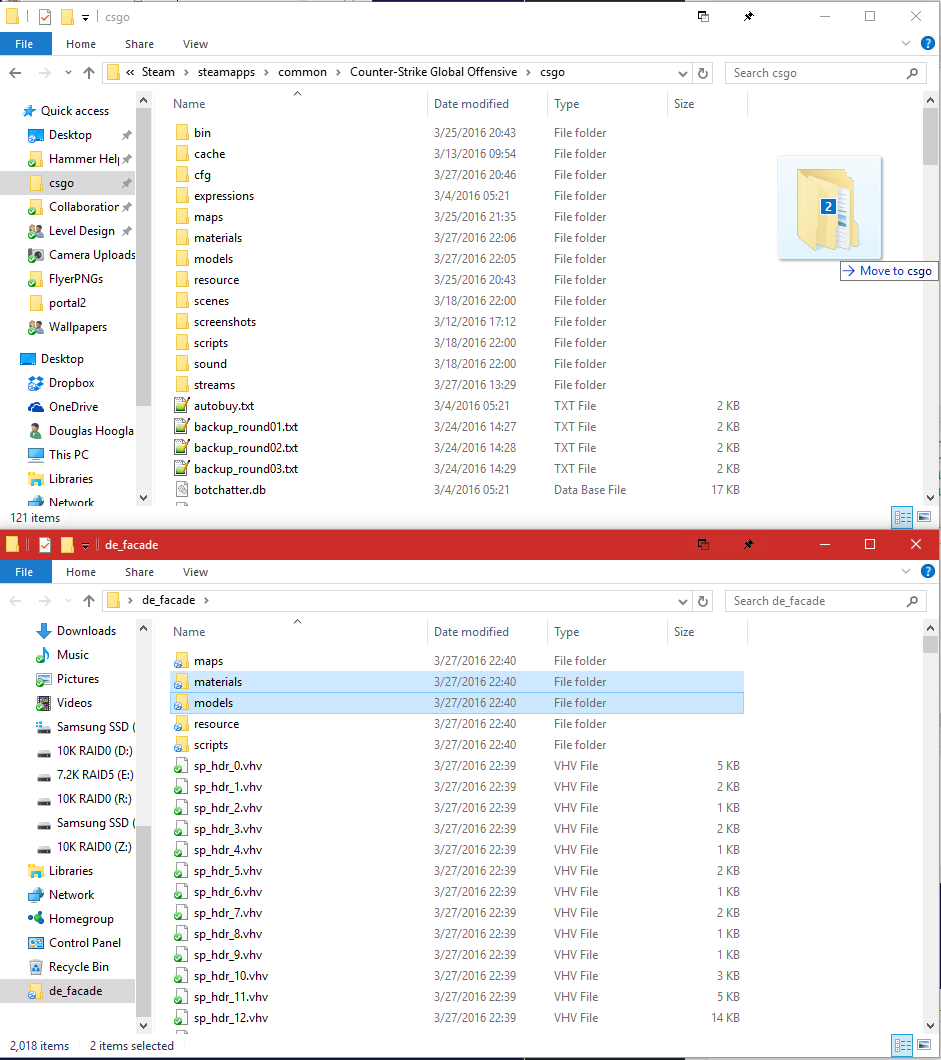
VIDE – Valve Integrated Development Environment
Start by opening VIDE.exe and open the Packfile Lump Editor (The Packfile Lump is where the files are stored). Then click Open and browse to your BSP file.

After the file has been opened you’ll see all the custom content that is stored inside the Packfile Lump. Click Extract and choose a destination file to extract all the content to.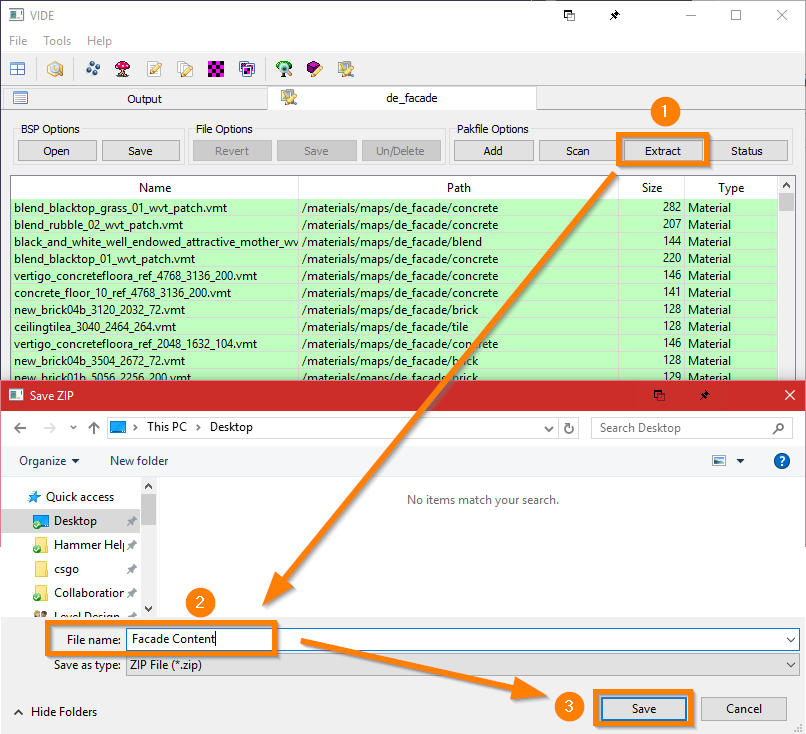
Just like before, select the desired folders and drag them into the root of the destination game.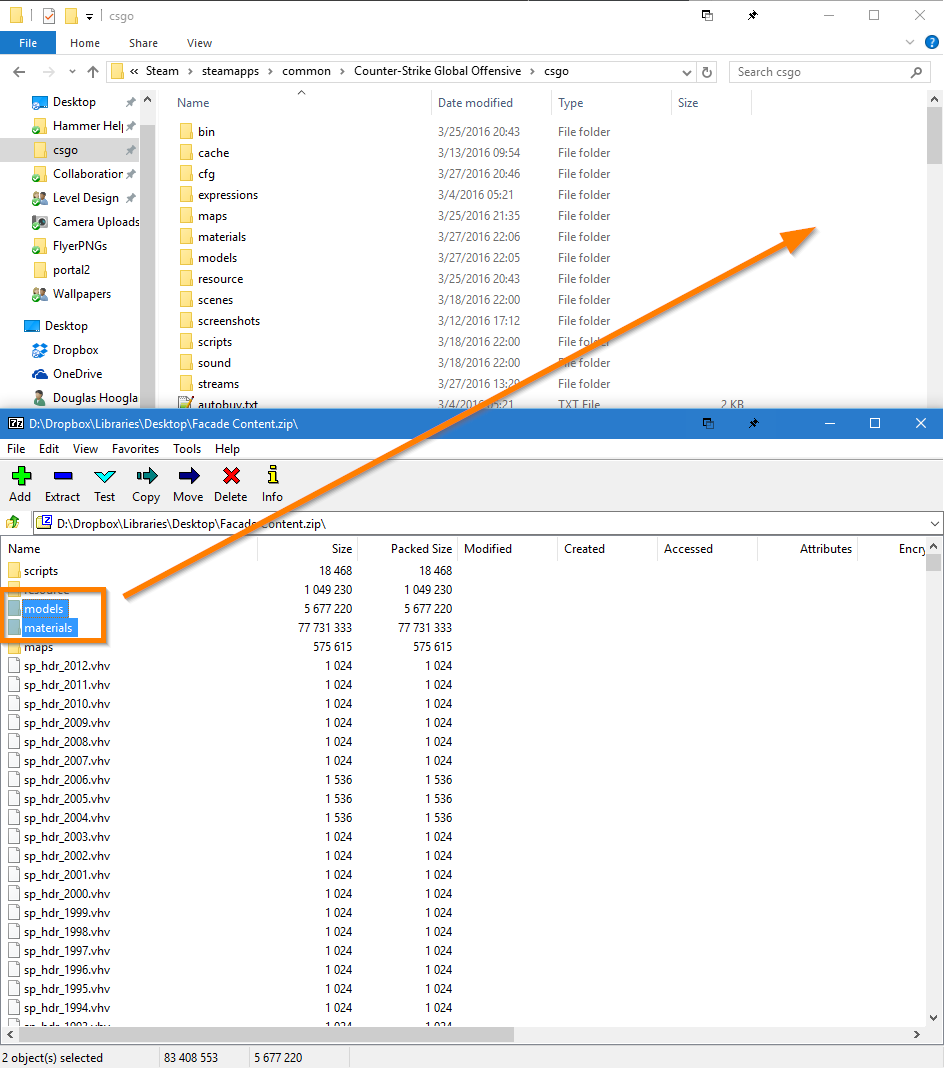
Porting a Single Texture
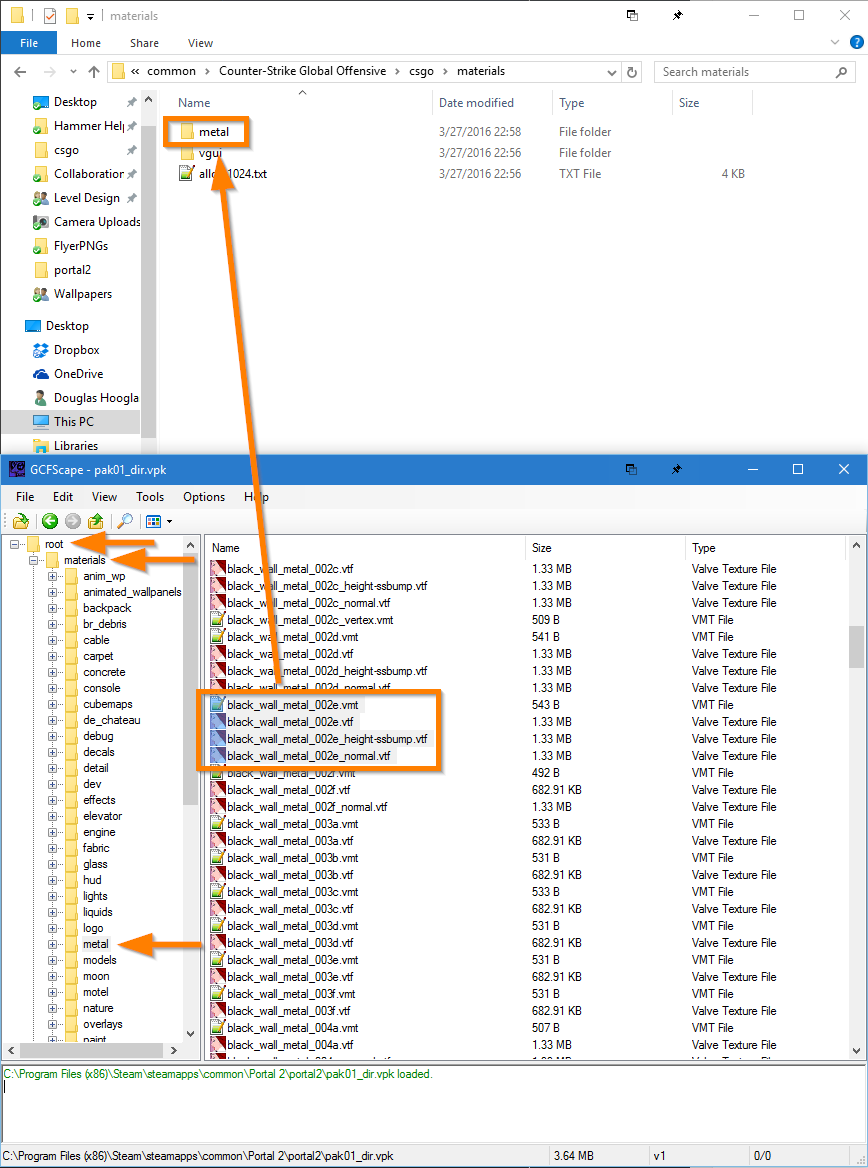
Porting a single texture is easy as well. First locate the texture you want to port in your source game’s VPK system. Most VALVe textures are named pretty well, so you’ll want to select all the files and it’s additional mask files as well (normal, ssbump, spec, ect..). When you find your texture note it’s full file path from root. The texture I’m porting is located at: root/materials/metal. I will need to place it in this exact same place in my destination game. So I’ve create a metal folder inside csgo/materials. I now just drag and drop the files.
IMPORTANT: You cannot change folder paths or file names without manually editing the VMT files for the textures. It’s best to leave them alone.
Load up the game and make sure the port was successful.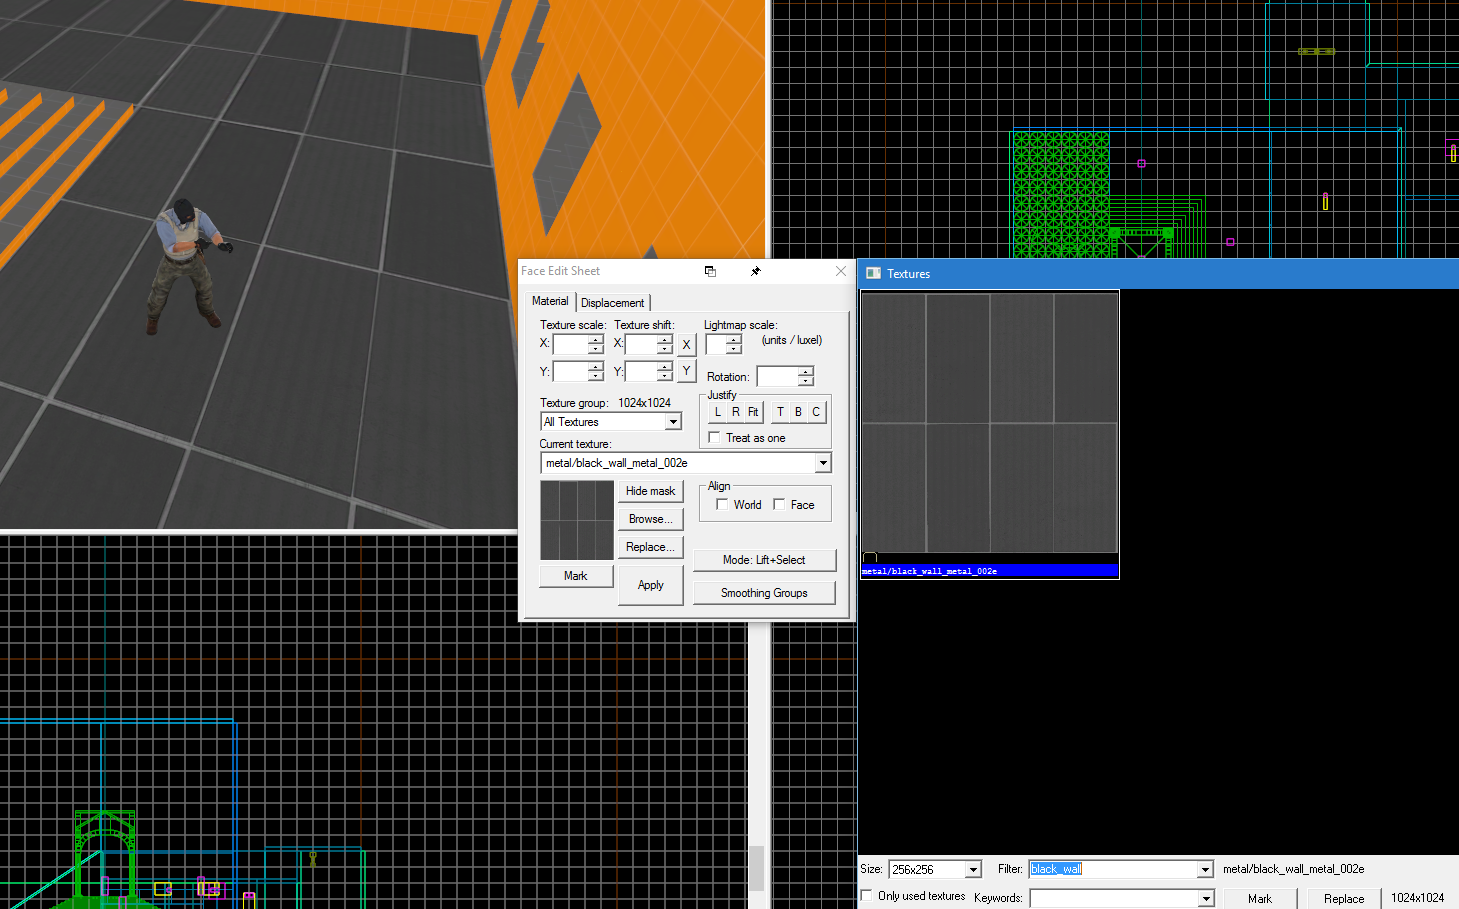
Porting a Single Model
Porting a single model is good if you just want one model from another game. Though this process is a bit more tedious. Start by finding your target model inside the VPK system for the source game. Find the files and just like the texture you’ll need to recreate it’s folder path inside the destination game.
IMPORTANT: File paths and names are baked into a MDL file. You cannot change file paths or names for models or a model’s textures without re-compiling the model. So just leave them alone.
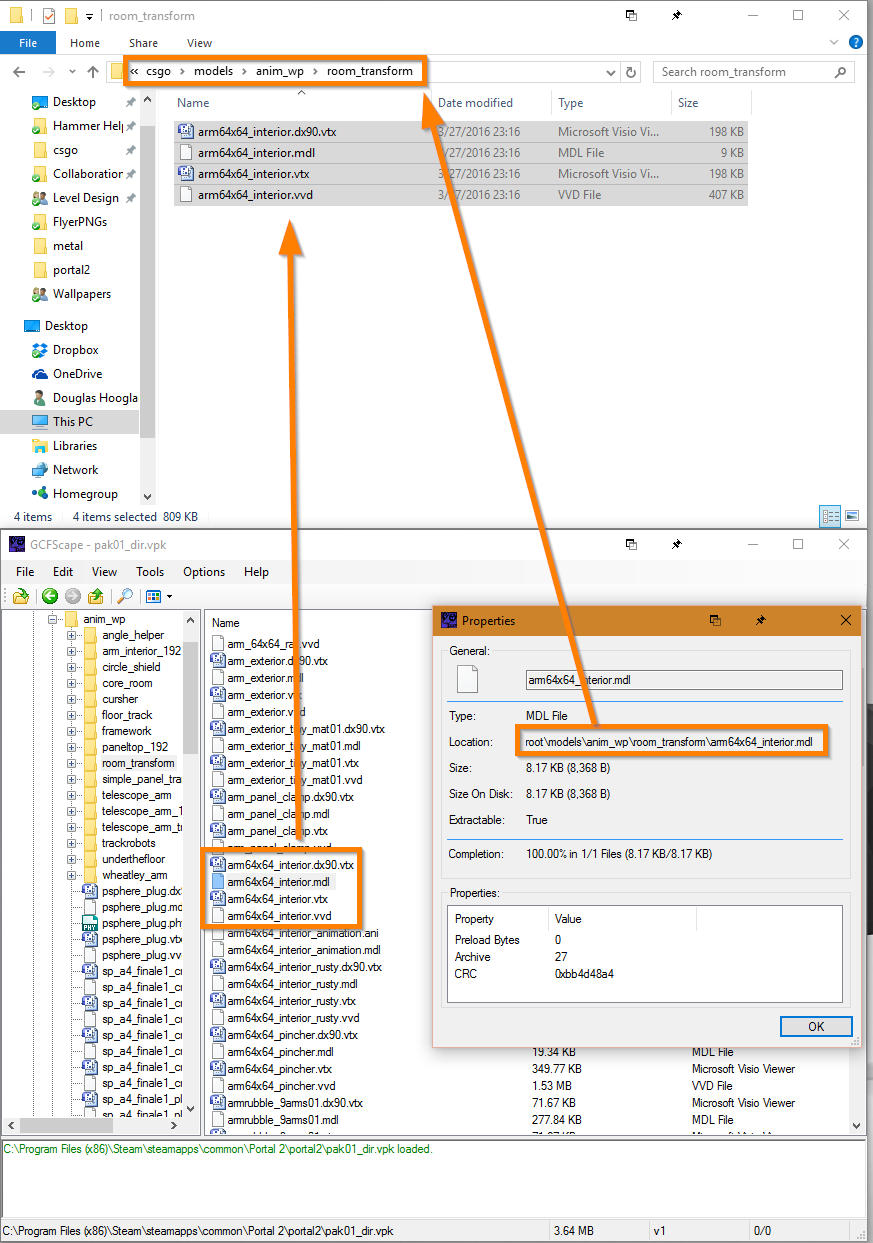
Now we need to hunt down this model’s textures. Typically they are in the same path, except materials/models/rest/of/path. Sometimes they aren’t there, so here is how to find them. Open the model.mdl file with a text editor, like Notepad++. Typically at the end of the last line in the file it will list all of the VMT files that the model is looking for. Then we just match up that path using Materials as root and we should see them inside the VPK system.
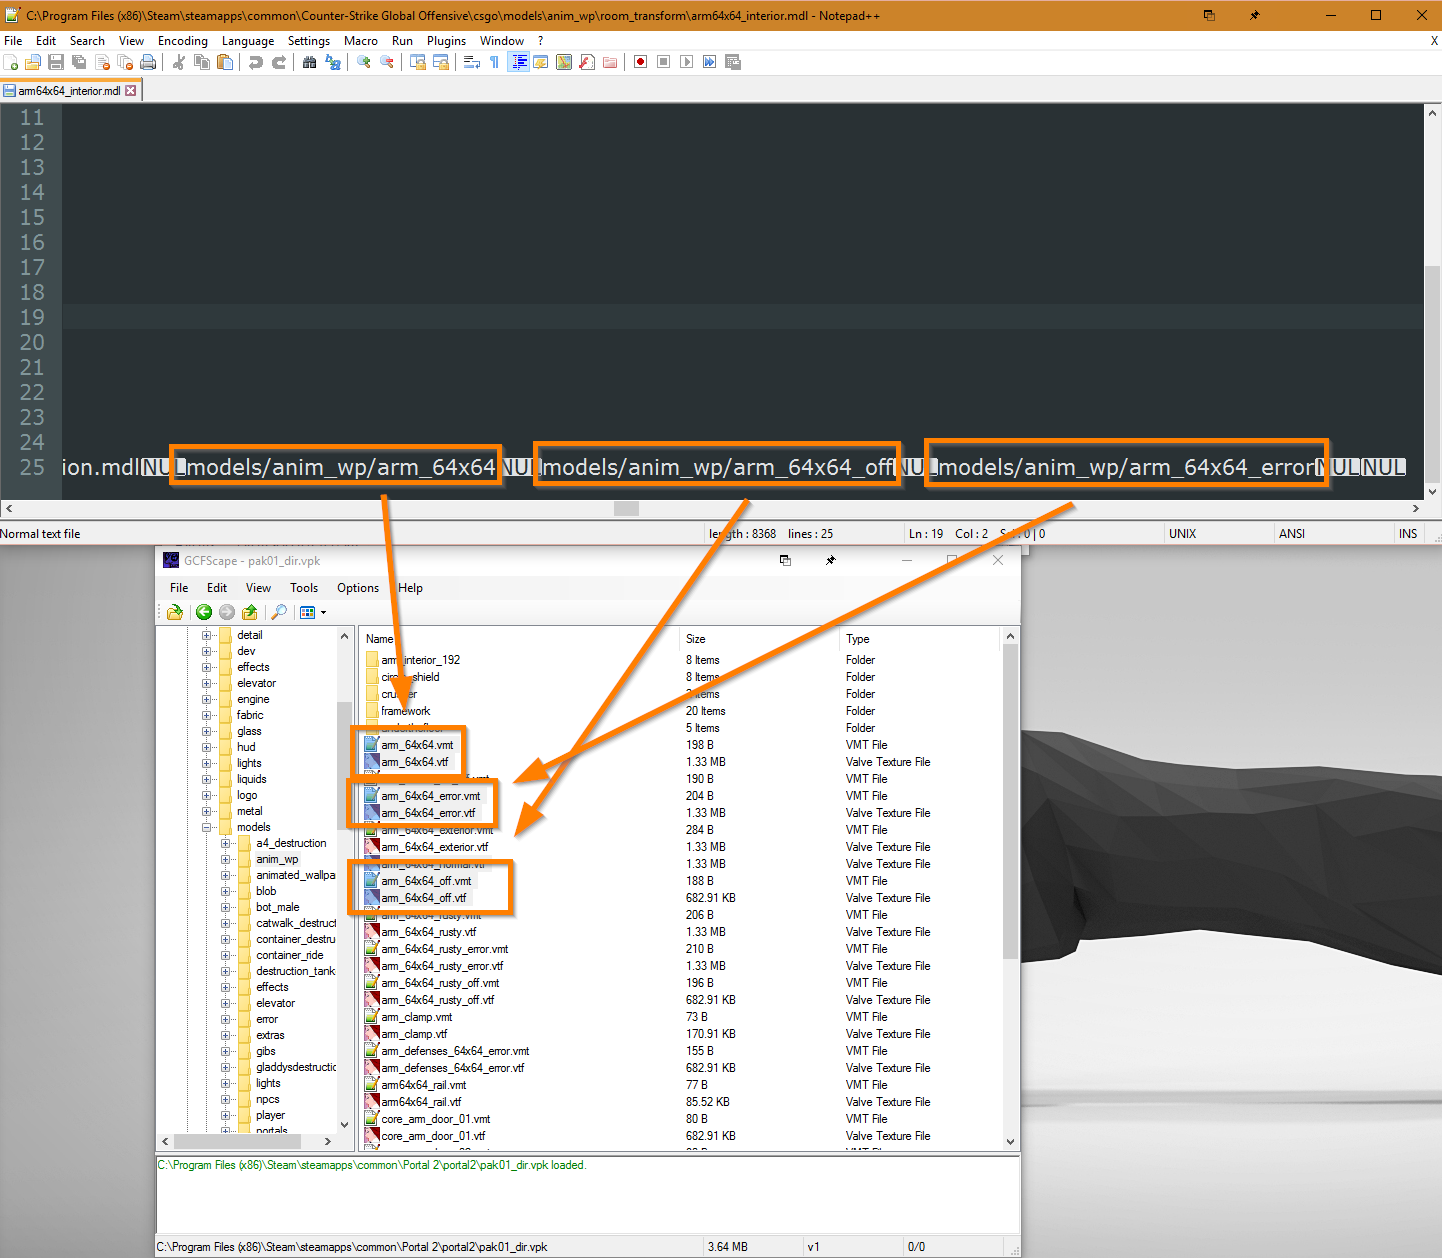
Recreate the folder path in the destination game, then copy the files.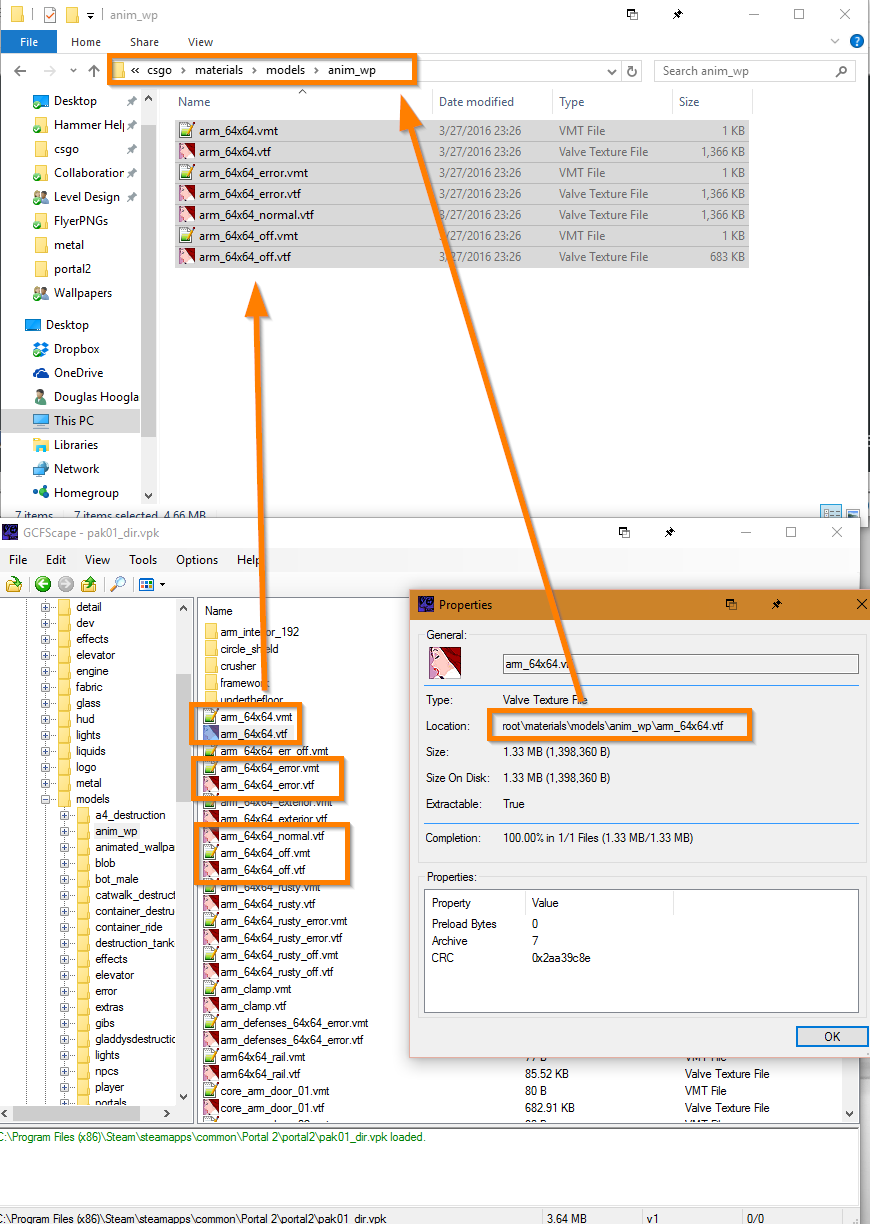
You may noticed that I’ve copied a file with the _normal post-fix. This is the normal map for the model, and should be copied as well.
Check inside Hammer to verify a successful port.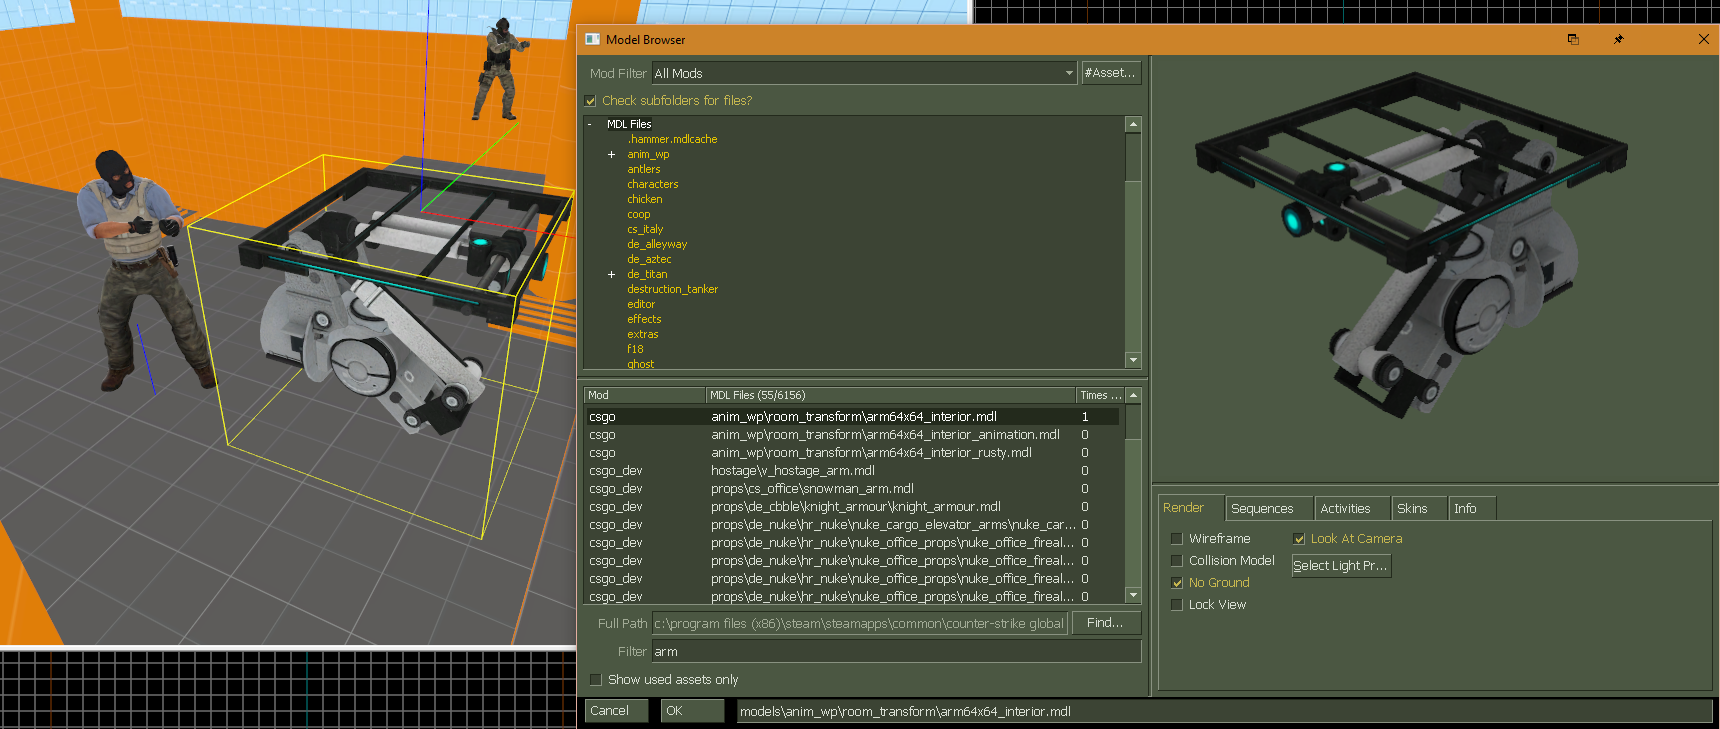
Troubleshooting
What do I do if something isn’t working how it should be? There are a few reasons that content would not work.
- Can the game I’m working in support the VTF version? If you’re porting from a newer game to an older game, this is probably the issue. If you’re going from older to newer, this is probably not the issue.
- Newer games are typically using VTF Version 7.5, older games cannot support this VTF version. As a result you’ll need to convert the VTF version down to 7.4
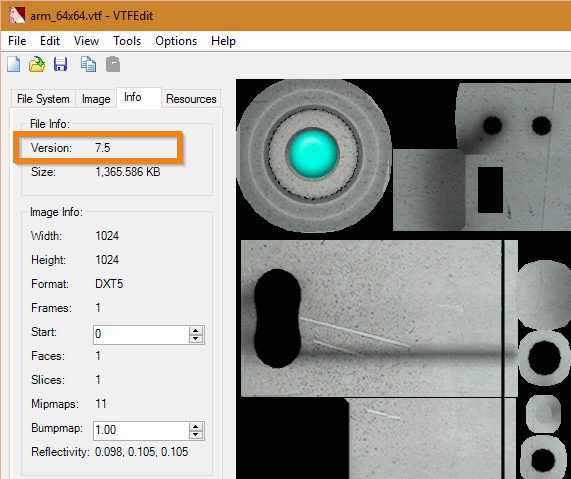
- You can use this program to batch convert folders and sub-folders of VTF version 7.5 to 7.4. Download VTF Version Changer
- Newer games are typically using VTF Version 7.5, older games cannot support this VTF version. As a result you’ll need to convert the VTF version down to 7.4
- The texture showing with errors, or just looks wrong.
- You probably did not grab all the shader maps or files the texture is looking for. Open the VMT file in a text editor for the texture that’s giving you issues. Make sure you have all the files it’s looking for. This texture for instance is looking for 5 different files! Make sure you have them all in the folders that it is looking in.
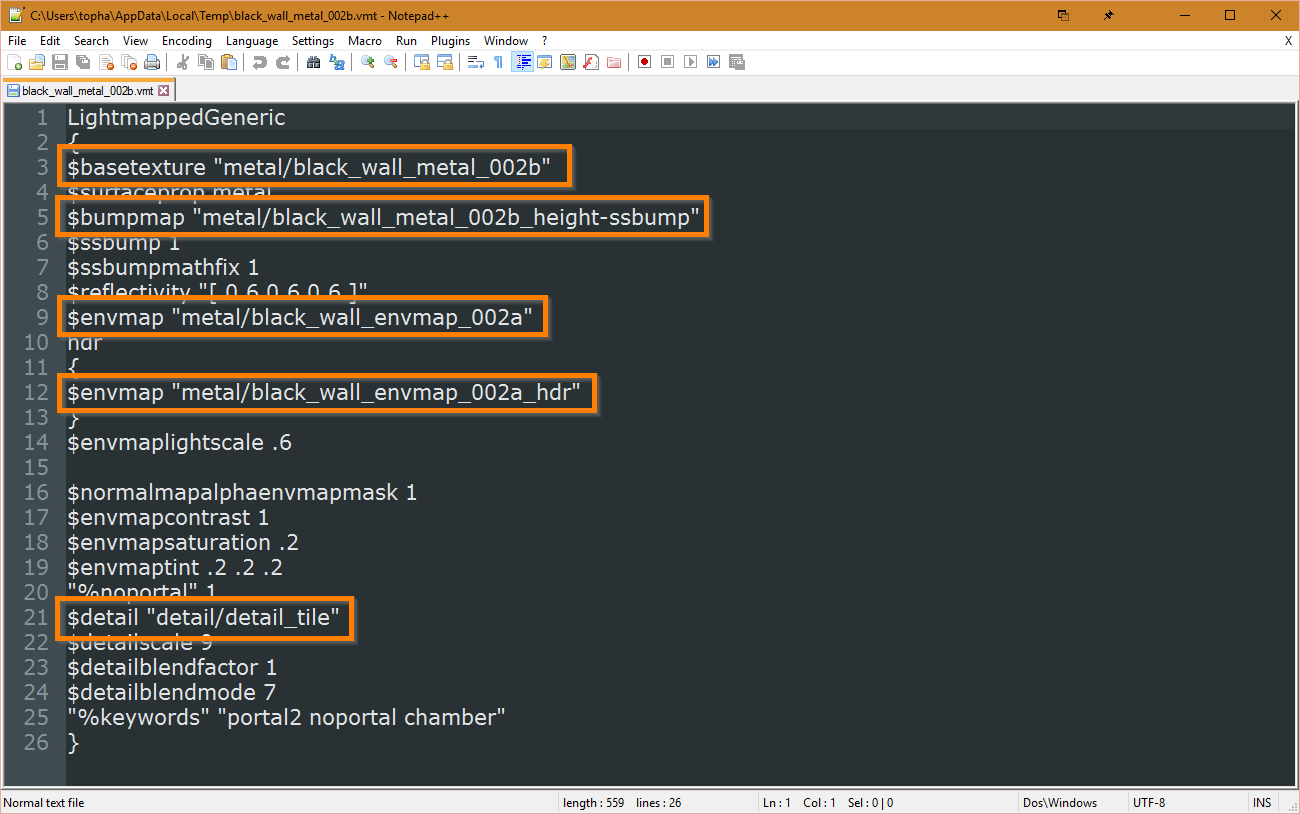
- You probably did not grab all the shader maps or files the texture is looking for. Open the VMT file in a text editor for the texture that’s giving you issues. Make sure you have all the files it’s looking for. This texture for instance is looking for 5 different files! Make sure you have them all in the folders that it is looking in.
- I have all the files for the texture, but it’s still not looking correct.
- Your best bet is to simplify the VMT file and add it’s effects back in one by one. Start by commenting (You can comment out a like by putting // in front of it) out every line except for $basetexture and add them back one by one until the texture breaks.
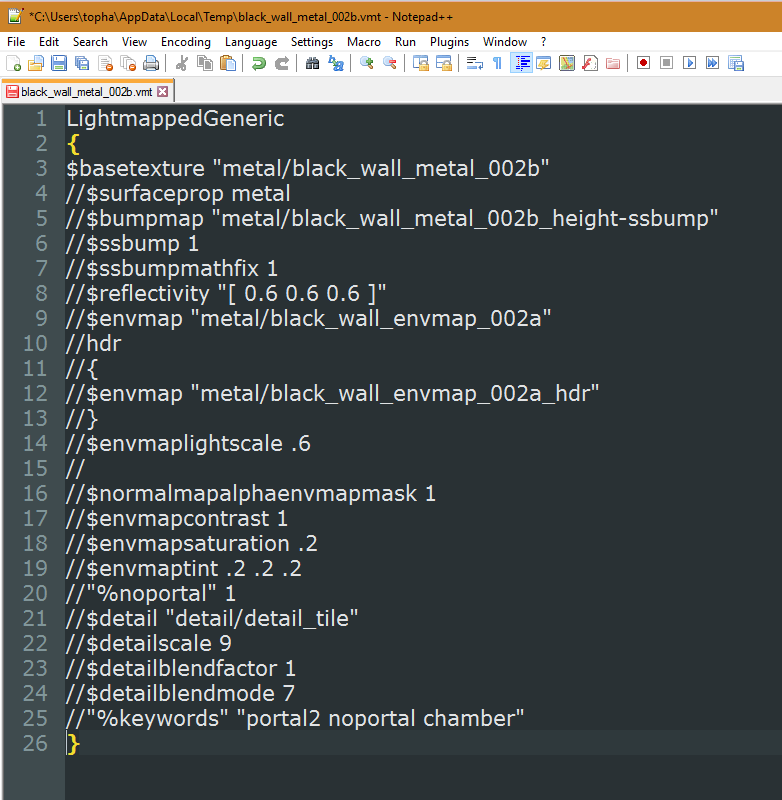
- Your best bet is to simplify the VMT file and add it’s effects back in one by one. Start by commenting (You can comment out a like by putting // in front of it) out every line except for $basetexture and add them back one by one until the texture breaks.
- When browsing for a certain model, the model browser and Hammer force close.
- Some models don’t work in same games for one reason or another. Please simplify the VMF down to just $basetexture and see if the issue persists. If the model browser keeps crashing you’re most likely out of luck on that model.
- Something else is broken!!!
Don’t forget to pack the content that you’ve ported into the BSP file before shipping!
Hope this helps!